Step-by-step procedure to install SQL Server 2016.
Run SQL Server 2016 setup.
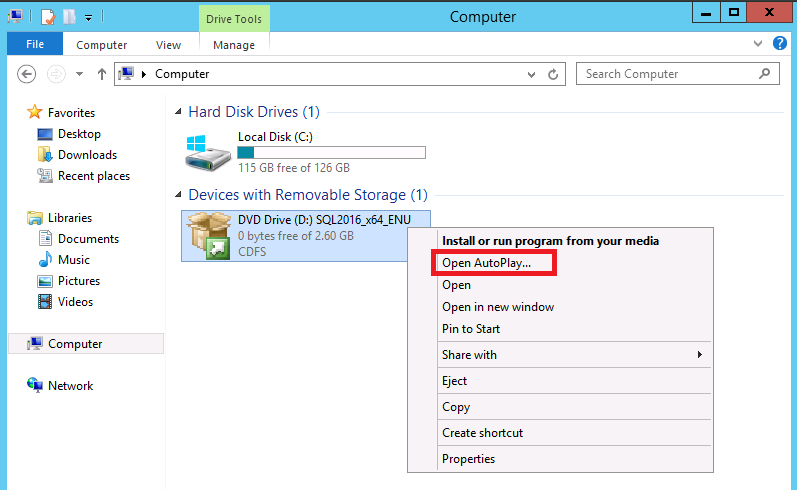
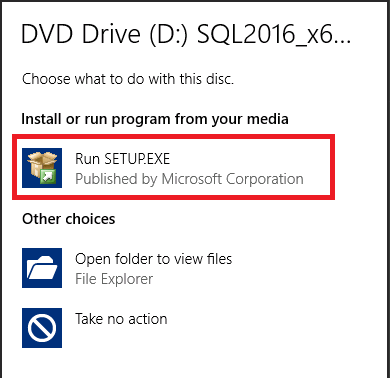
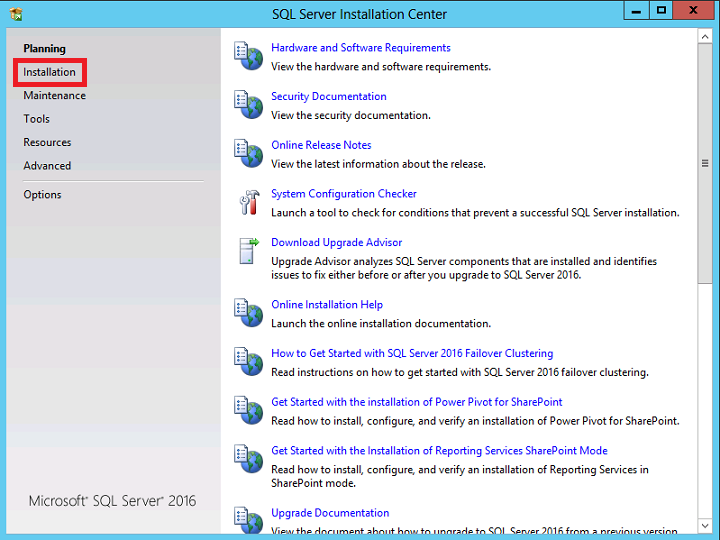
On the screen below, make a click on the "Installation" hyperlink in the left
side of the screen.
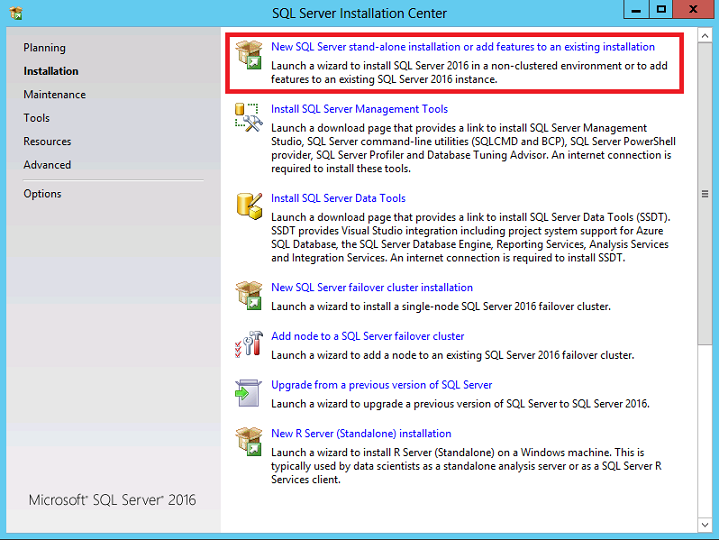
The next screen shows the types of installation available. Let's select the
first type available "New SQL Server stand-alone installation or add features to
an existing installation".
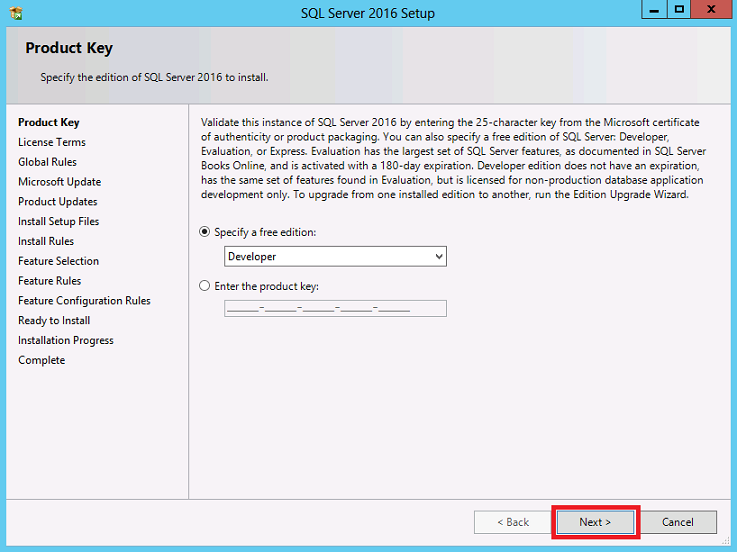
On the page below, specify the edition of SQL Server to install, if you are
choosing to install a free edition of SQL Server 2016 or an Evaluation Edition
of SQL Server 2016.
You should also provide a product key, if you are installing a licensed edition
of SQL Server. Sometimes the product key is
included in the media (the product key is pre-pidded).
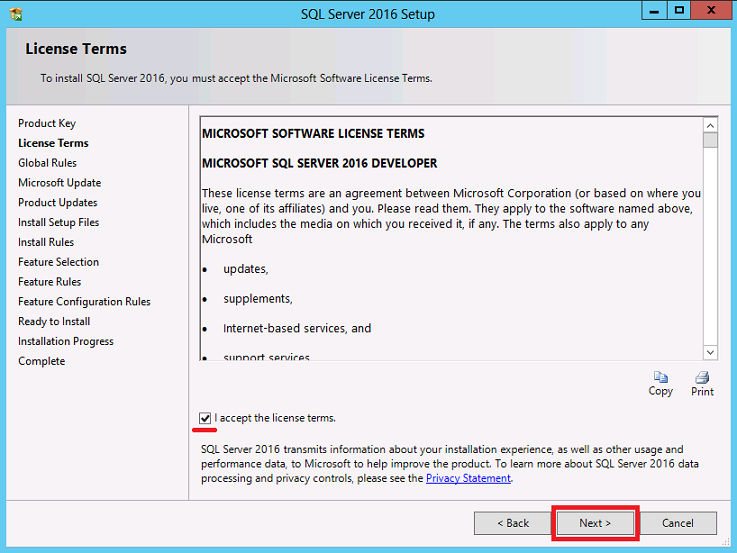
Below image is associated with the License Terms page. Read the
license agreement and if you agree with it, check the "I accept the license terms"
check box, and then click the Next
button.
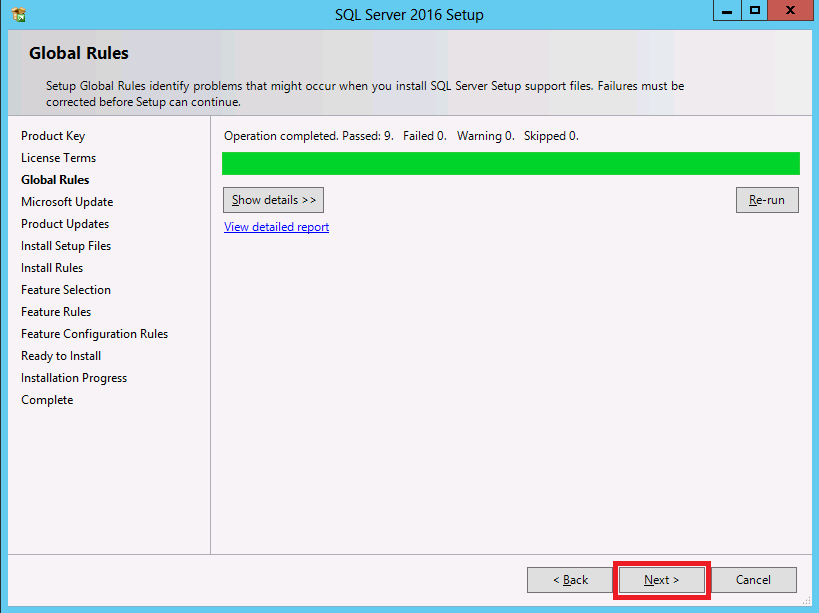
Below screen belongs to the set of Global Setup Rules. To have
detailed information about the cause of errors and warnings you may receive
click on the "Show details" button and then click on the blue hyperlinks associated with each warning/error.
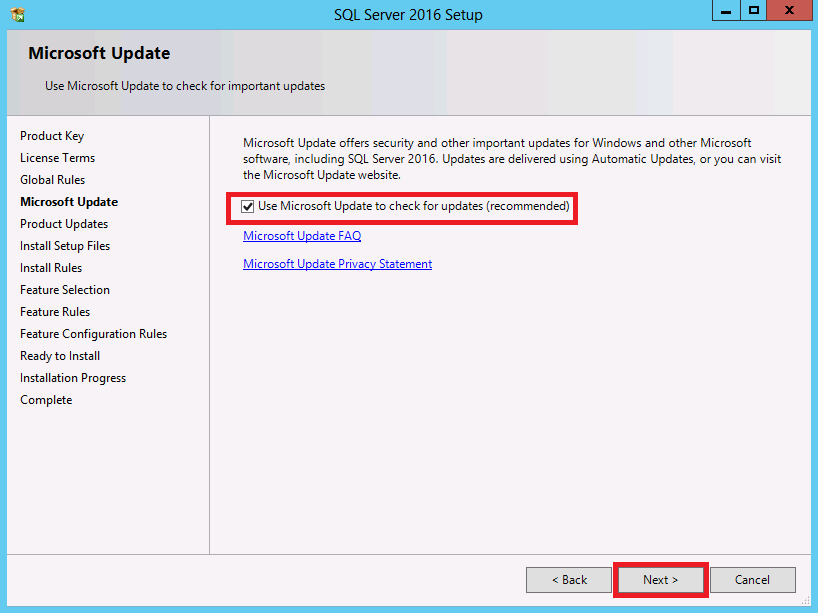
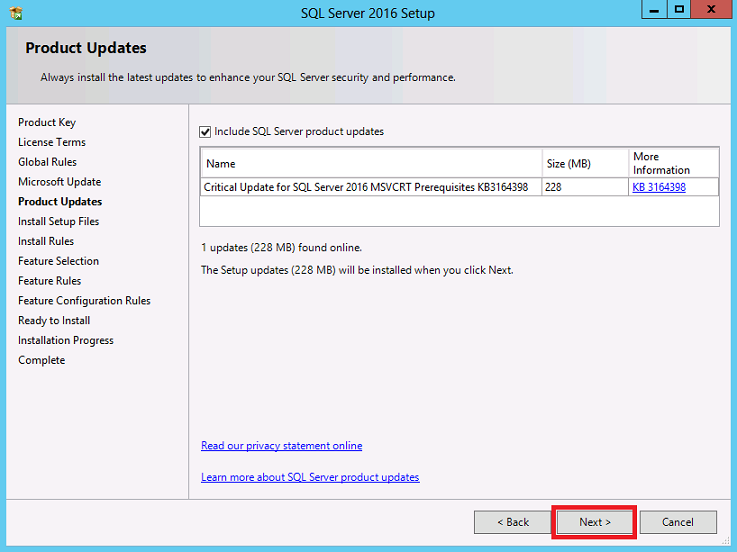
On the "Microsoft Update" page, SQL Server 2016 setup is trying to get updates from Microsoft
Update, and for this reason is important to have Internet access when installing
SQL Server as mentioned at the beginning of this article. Make a click on the
checkbox to get the updates, if the computer has Internet access, then click on
the Next button.
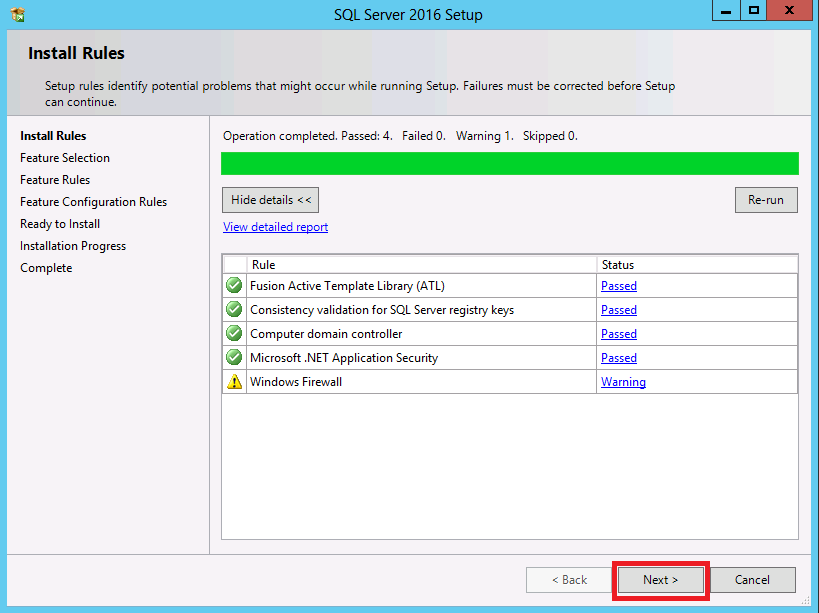
The next screen belongs to the Install Rules page. To have
detailed information about the cause of errors and warnings you may receive
on this page, click on the blue hyperlinks associated with each warning/error.
About the Windows Firewall warning you are seeing on this image, you can go ahead with the installation of
SQL Server, but when it finishes configure your Windows Firewall to allow SQL
Server access or disable it. Click
here to
know how to configure Windows Firewall for SQL Server access.
Alternatively, you can opt to turn off Windows Firewall if you are installing
SQL Server for personal use. You can go to Control Panel and turn it off
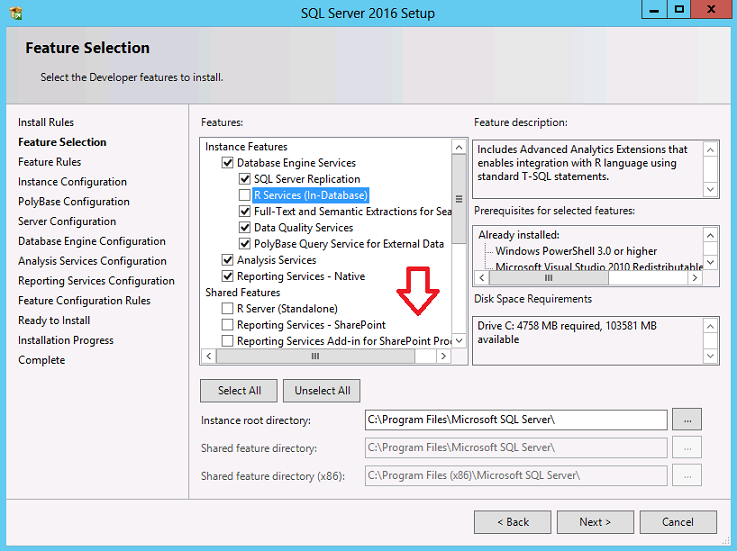
On the Feature Selection page, please select the features you would like to
install. A description of each feature will appear on the "Feature description"
area when you click on a feature. For a detailed description of each feature,
please click
here.
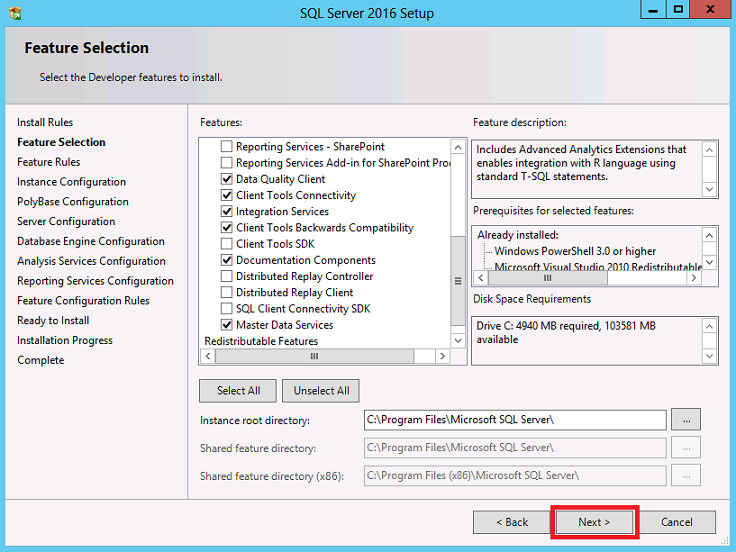
Once you have selected the features to install, please click on the "Next"
button.
The next screen is the "Feature Rules" and a common warning on this screen is
shown below. The warning says "Post-installation steps are required for Advanced
Analytics Extensions".
If you are planning to use SQL Server R services after installing SQL Server
2016, you must perform some additional steps to register the extensions and to
provision required accounts. The steps are outlined
here.
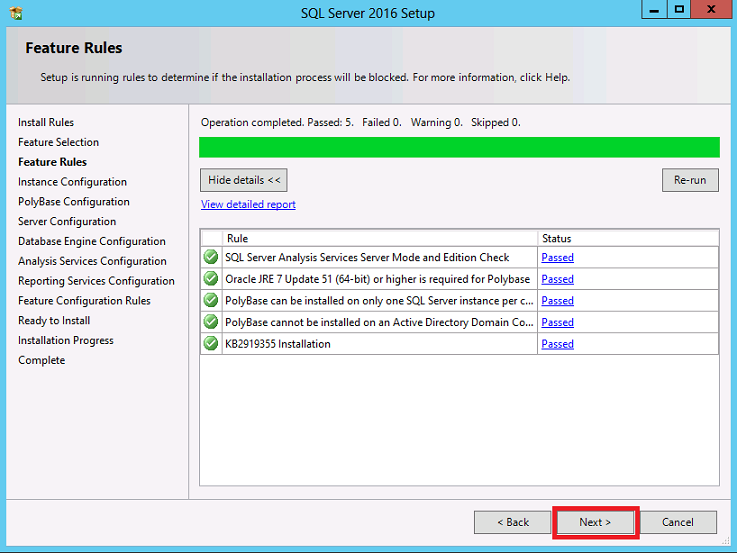
On the Instance Configuration page, select a default or named instance for your
installation. SQL Server supports multiple installations on the same computer,
each installation receives the name of "instance". The default instance gets the
name of the computer, but the named instances, receive the name of the computer
plus the name provided by the user on this setup page. To access a default
instance once it is installed, using SQL Server Management Studio or any other
program, you just need provide the computer name. To access a named instance,
you will need to provide the name of the instance in the forma of computername\nameoftheinstance.
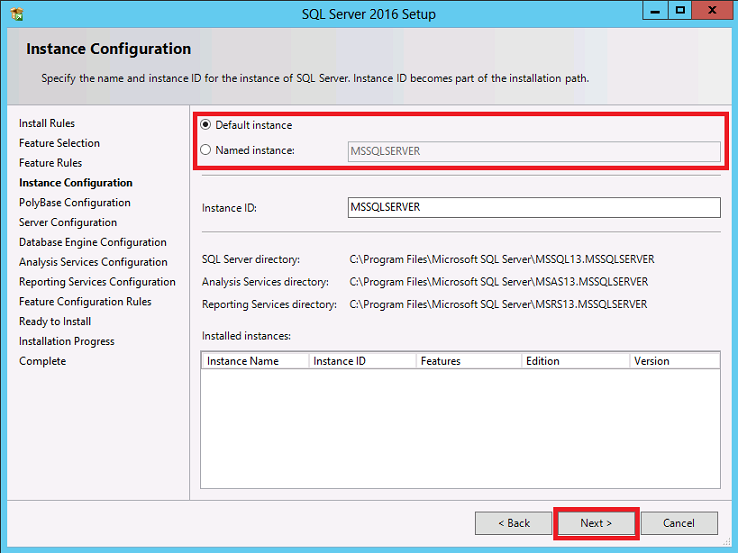
On the PolyBase Configuration page of SQL Server setup, select the standalone
option to configure this SQL Server instance as a standalone PolyBase head node.
Choose the second option to use this instance as part of a PolyBase scale-out
group, and this will open the firewall to allow incoming connections to the SQL
Server Database Engine, SQL Server PolyBase Engine, SQL Server PolyBase Data
Movement service and SQL Browser. The firewall will be opened to allow incoming
connections from other nodes in a PolyBase scale-out group. Selecting the scale
out option option will also enable Microsoft Distributed Transaction Coordinator
(MSDTC) firewall connections and modify MSDTC registry settings. For more information about what scale-out option to choose, click
here.
Please, specify a port range with at least six ports also. SQL Server setup
will allocate the first six available ports from the range.
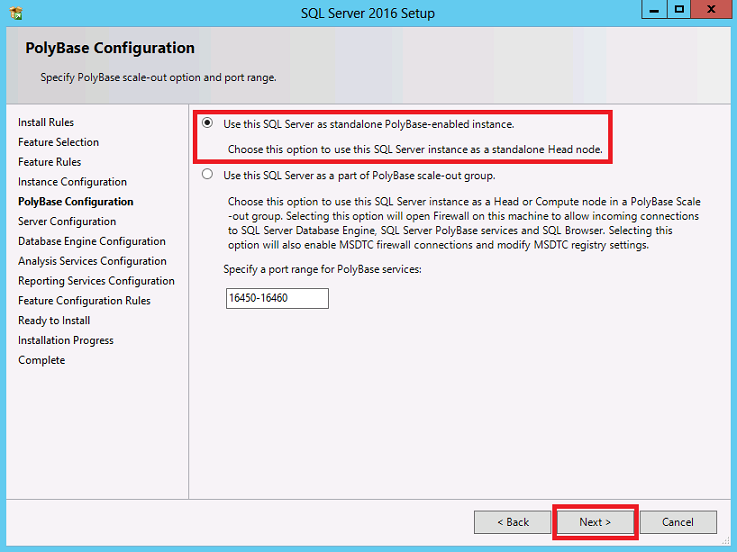
On the following screen you need to provide the service accounts that SQL Server services
will use. As you can notice, SQL Server setup provides virtual accounts by
default, they are auto-managed, they can access the network on a domain
environment by using the credentials of the computer account.
However, I still recommend to create a local user or use a domain user account to start SQLServer
services.
If the computer is not part of a domain, use a local user account without
Windows administrator permissions. You can create this account using Control
Panel -> User Accounts. Please provide a strong password to this account
since SQL Server setup will required it on this "Server Configuration" page.
Use a Domain User Account if the service must interact with network services or
access domain resources. This account should be pre-created by a domain
administration in your environment.
Whether you create a local user or a domain user account, the password you use
to create the account must be a strong password since SQL Server setup will
required it on this "Server Configuration" page.
You can also use built-in accounts (the Network Service account, Local Service,
Local System) as service accounts. However, I would
not recommend to use Local Service Account for SQL Server (MSSQLSERVER). Use
Local System if you need a very high-privileged account, or you are having
issues installing SQL Server using virtual accounts as service accounts. It has extensive
privileges on the local system.
Microsoft recommends you to specify an individual account for each service. The
service accounts used for this configuration must have a strong password as
mentioned above,
otherwise you will get the error "Invalid or missing username or password. To
continue, provide valid credentials for the SQL Server Agent service". A
strong password is one that has a combination of letters in uppercase,
lowercase, numbers and special characters.
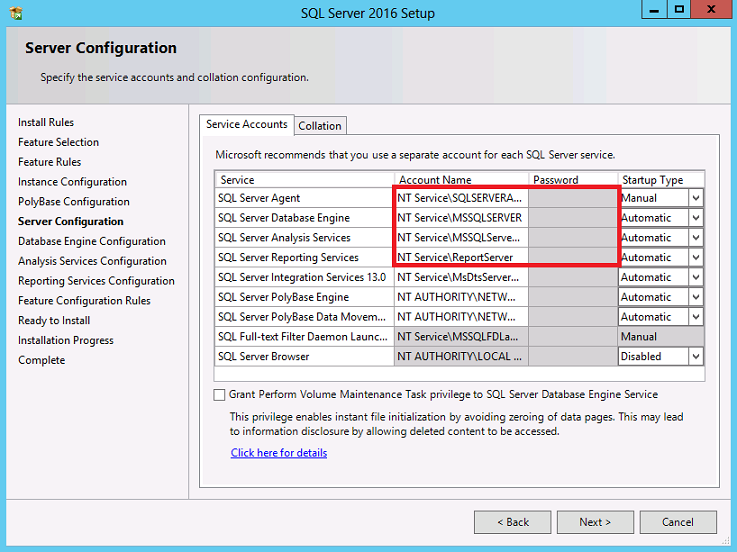
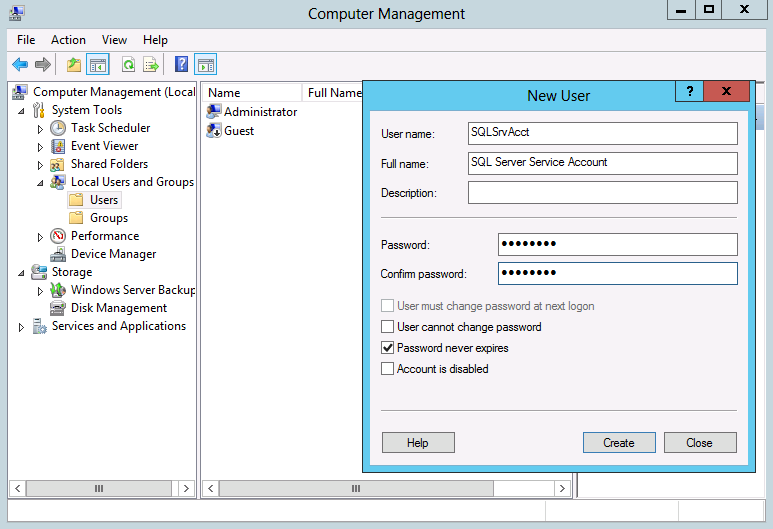
To provide a local Windows account as SQL Server service account, you need to
open Computer Management and create a standard user account as shown in the image below.
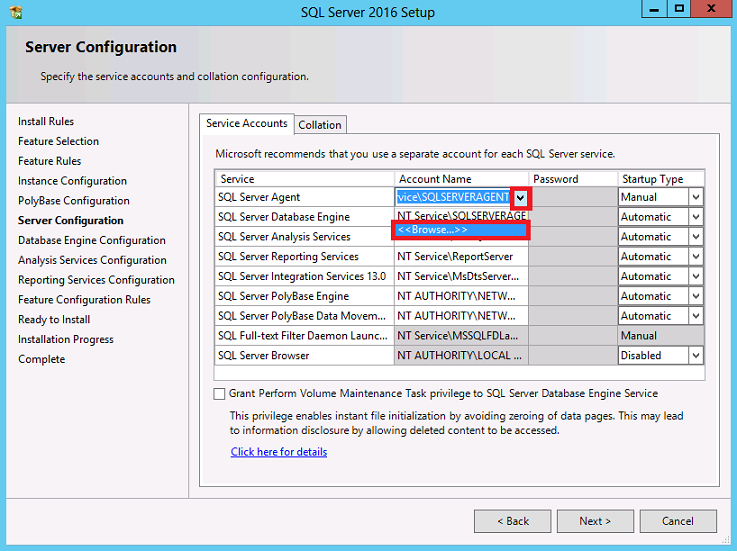
Replace default existent service account on the Server Configuration page with
the newly created local account, with a Domain Account for built-in account as
Local System. Look at below images to know how to change a service account.
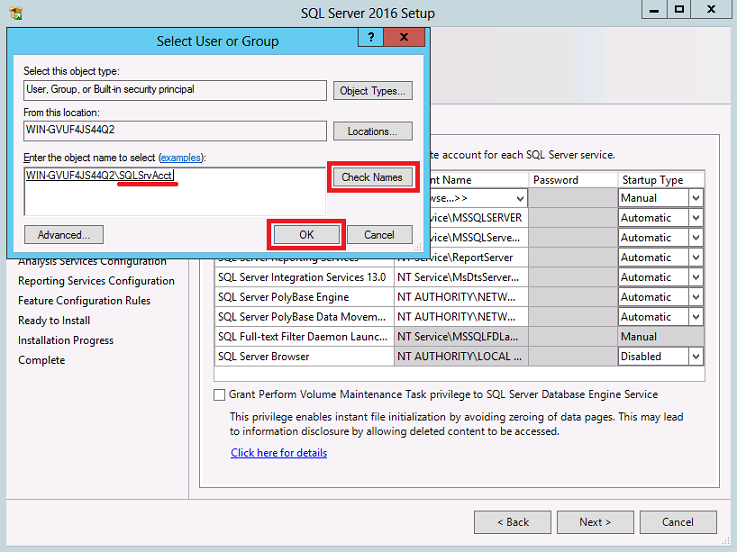
Write the name of the account we created or the name of the domain account,
click on Check Names to verify the name is correct, and then click the OK
button.
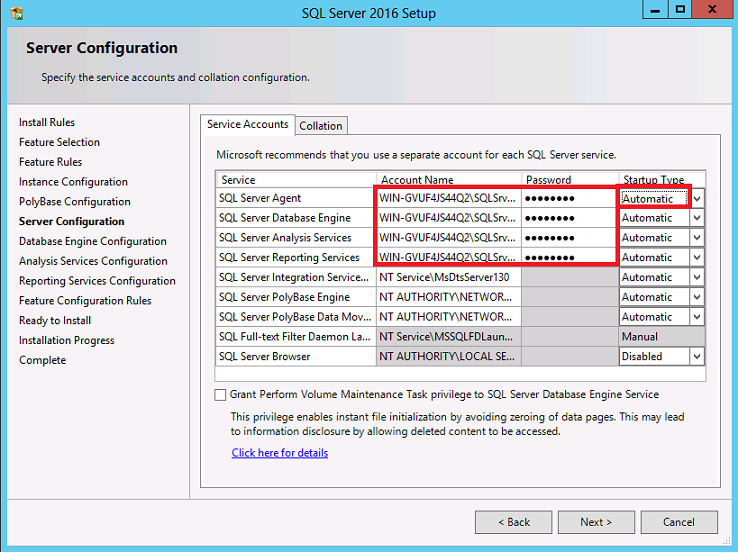
You can do the same for the first 4 SQL Server services: SQL Server Agent, SQL
Server Database Engine, SQL Server Analysis Services and Reporting Services.
If you click on the Next button, and you receive an error message ("There are validations errors on this
page"), probably you did not provide a strong password for the service
account, or maybe the password does not
match with the password the account has on Windows or on Active Directory. If you
cannot get rid of this message, change the service account specified at the
bottom of the page (with the red balloon) to Local System my work.
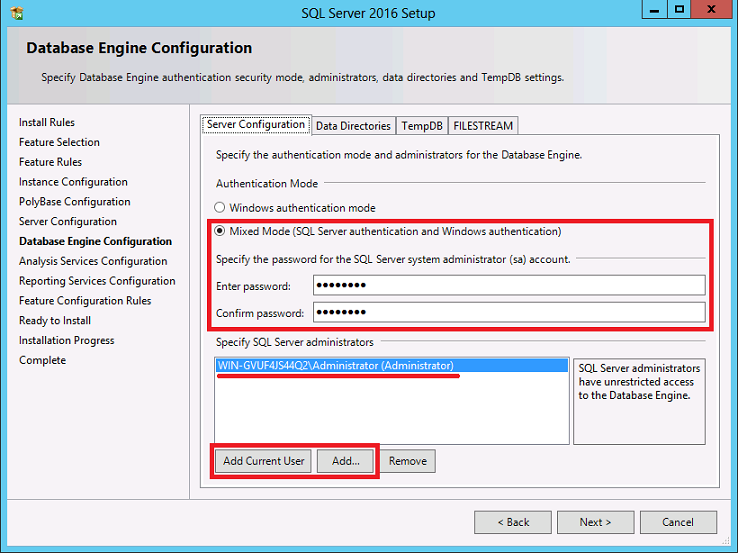
On the next screen, the Database Engine Configuration page (see below image), choose the authentication mode to
use for your SQL Server installation. If you select Mixed Mode, Setup creates an sa account.
Enter and confirm the password for
the (sa) login when you choose Mixed Mode Authentication.
You will get the error "Missing system administrator account. To continue,
provide at least one Windows account to provision ...", if you fail to provide
SQL Server administrators and try to continue with the next page of Setup.
The error message "There are validation errors on this page ..." will also
appear. Click the buttons "Add Current User" or "Add ..." to provide at
least one account that will have unrestricted access to the SQL Server instance.
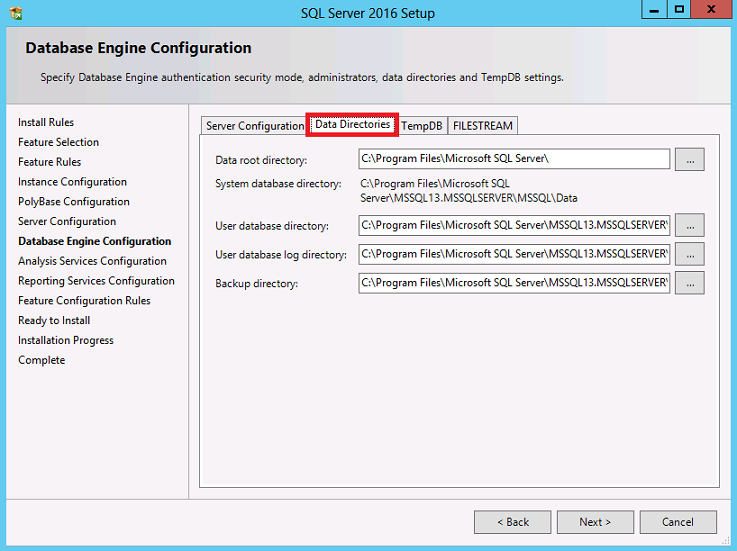
Click on the "Data Directories" tab (above image), to change the location of SQL
Server default directories, if you prefer them to be hosted on another disk
drive/partition. For information about default location of files on
SQL Server instances, please click
here.
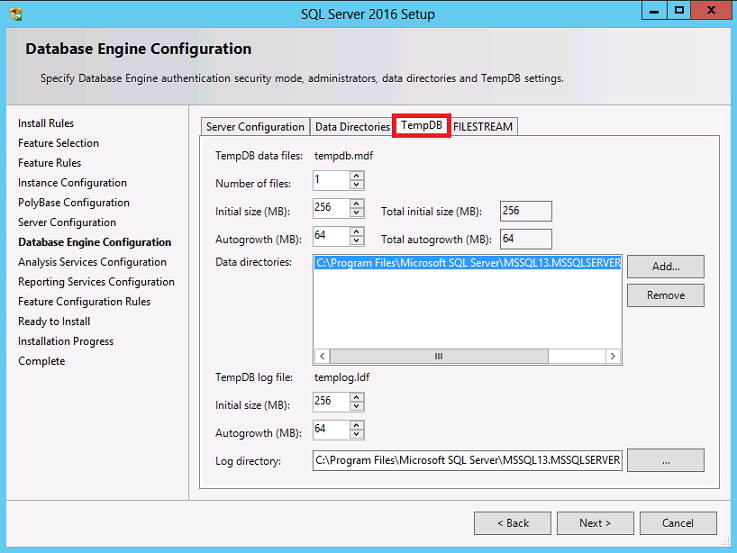
Now on the TempdDB tab of the Database Engine Configuration page of SQL Server
2016 setup, you have the opportunity to configure TempDB settings.
SQL Server setup will allow you to set a maximum 256 MB for the size of TempDB
data file and the same for the size of TempDB log file. This is because of the
impact of the impact on installation time. The size of both database files can
be set higher after SQL Server setup finishes installation.
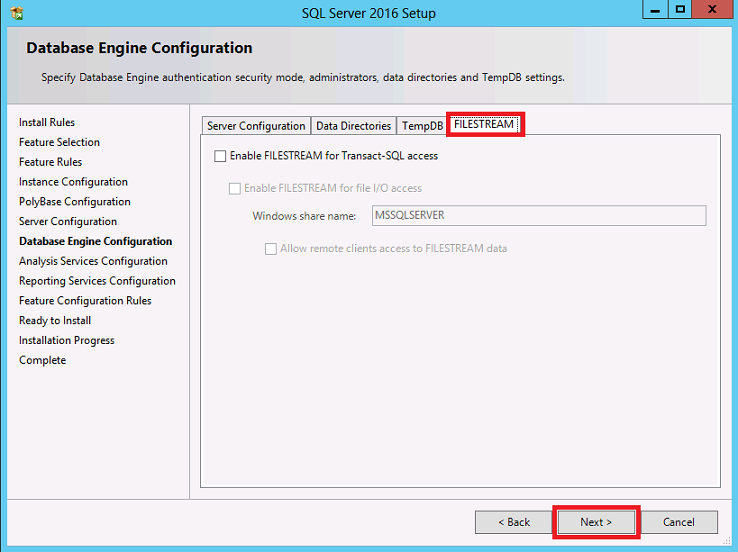
Use the FileStream tab on below screen to configure FileStream settings on this instance. To enable it, select
"Enable FILESTREAM for Transact-SQL access".
Select "Enable FILESTREAM for file I/O streaming access" to enable Win32
streaming access for FileStream.
On the "Windows share name" text box, to enter the name of the Windows share in
which the FileStream data will be stored.
Select "Allow remote clients to have streaming access to FILESTREAM data" to
allow remote clients to access this FileStream data on this server.
For more information about enabling and configuring FileStream, please click
here.
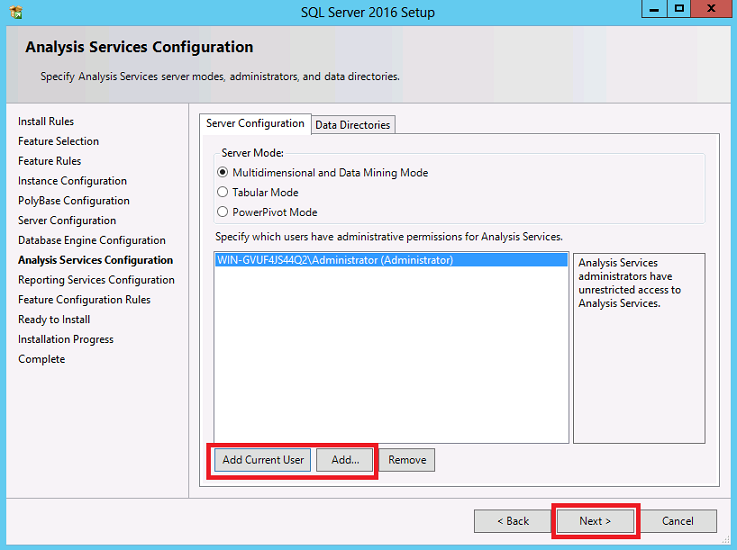
On the "Analysis Services Configuration Page" (bellow image), please select "Install Analysis Services in Multidimensional and Data Mining Mode" to
install Analysis Services with support for online analytical processing
databases and data mining models.
Select "Tabular Mode" to install Analysis Services with support for tabular
models.
Each mode is exclusive of the other.
Please provide also a user account that will be an Analysis Services
administrator.
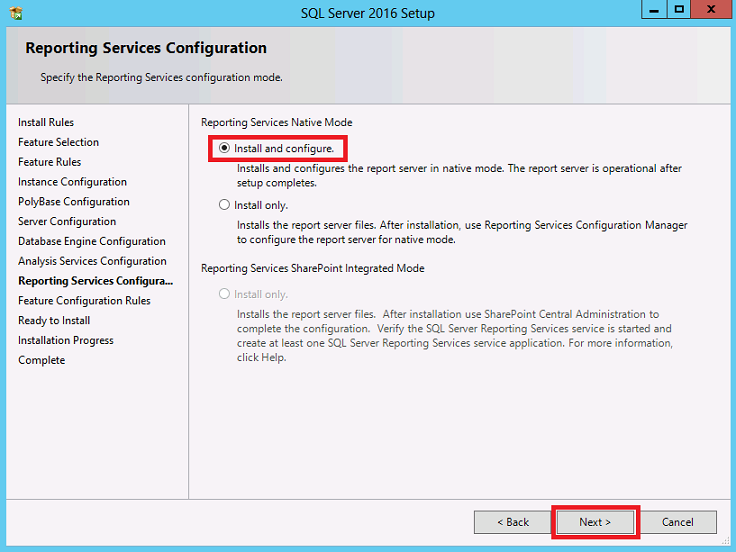
On the Reporting Services Configuration page (above), choose to install Reporting
Services on Native Mode or SharePoint Integrated Mode.
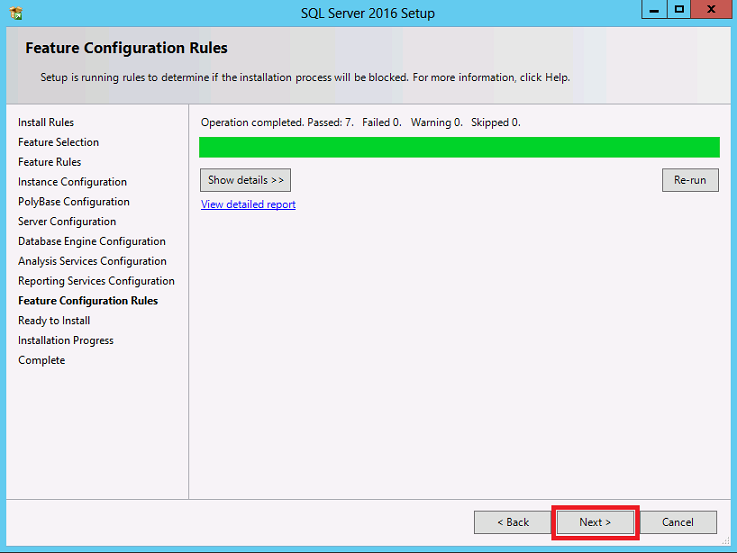
On the Feature Configuration Rules page, if the status of all rules is passed,
just click on the Next button. To have detailed information about the cause of
errors and warnings you may receive on this page, click on the blue hyperlinks
associated with each warning/error.
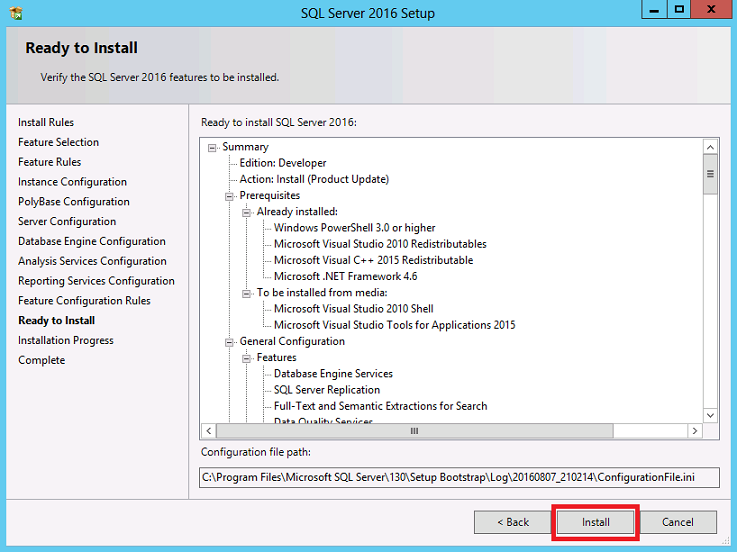
On the Ready to Install page, review the summary of features and components for
your SQL Server installation. To proceed, click Install.
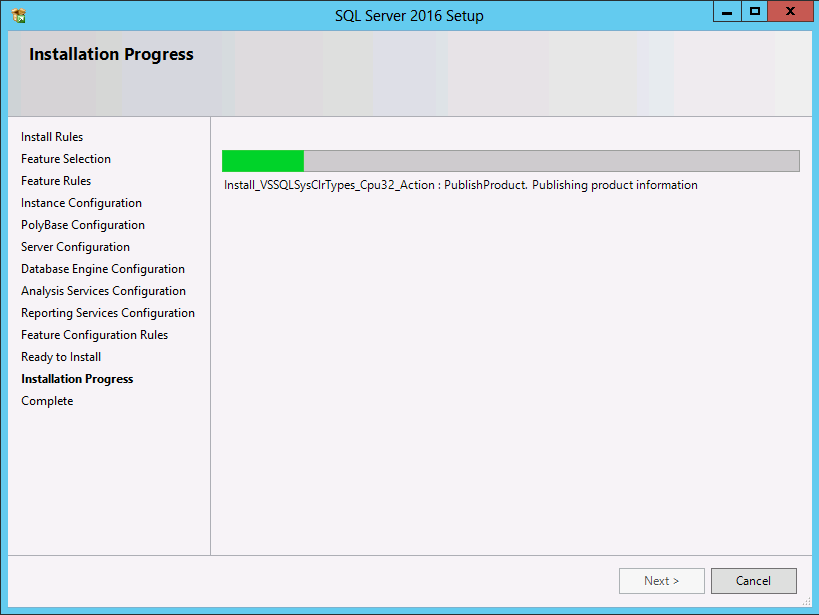
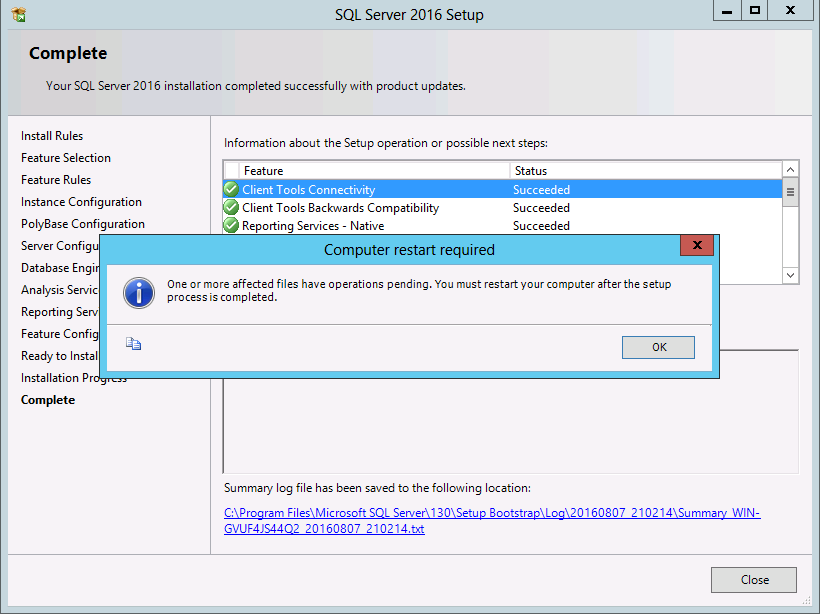
On the "Complete" page (above image), you can
view the Setup summary log by clicking the blue link provided on the bootom this page. To exit
the SQL Server Installation Wizard, click Close.
If the installation fails or you experience any issue on your computer please
create a thread on any of the following SQL Server forums:
![[Company Logo Image]](images/SQLCofee.jpg)
